If you're a car enthusiast, then you know how important it is to have a car rotisserie. It makes working on your car restoration project easier, especially when it comes to accessing hard-to-reach areas. While there are many commercial rotisseries available on the market, they can be quite expensive. However, with some basic woodworking skills and the right tools, you can build your own car rotisserie out of wood.
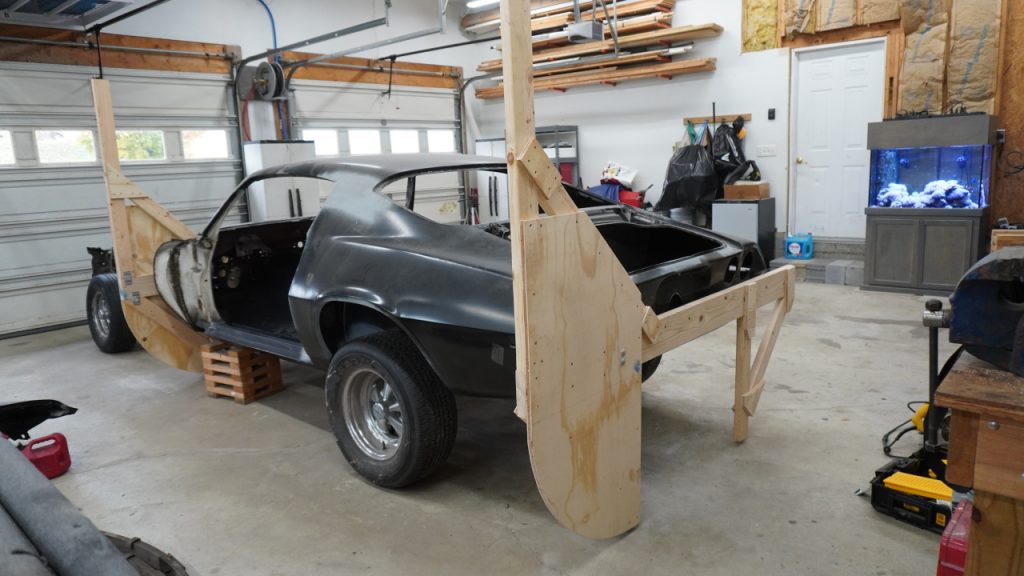
Before you start building your automotive rotisserie, it's important to have a clear understanding of what it is and how it works. An auto twirler is a tool that allows you to rotate your car so that you can easily work on all sides. It's made up of two vertical supports, which are connected by a cross member.
The cross member is then attached to a set of arms that hold the car in place. These mounting arms can be rotated using a mechanism that is connected to a set of wheels or casters, which allows you to move the car around as needed.
Here's a step-by-step guide on how to build your own car rotisserie out of wood.
Materials needed:
- 6 pieces of 2x4 lumber, 8 feet long
- 6 pieces of 2x6 lumber, 8 feet long
- 8 pieces of 3/4 inch plywood, 2 feet square
- 8 pieces of 3/4 inch plywood, 3 feet square
- 12 pieces of 1/2 inch plywood, 2 feet square
- 2 pieces of 1/2 inch plywood, 8 feet long
- 4 pieces of 1/2 inch threaded rod, 8 feet long
- 4 pieces of 1/2 inch steel pipe, 8 feet long
- 16 pieces of 1/2 inch nuts and washers
- Wood glue
- Wood screws
- Metal brackets
- Saw
- Drill
- Wrench

Step 1: Cut the lumber to size
Start by cutting the lumber to the desired size. Cut the 2x4s and 2x6s into 4 pieces each, 4 feet long. Cut the 1/2 inch plywood into 2 feet squares, and the 3/4 inch plywood into 2 feet and 3 feet squares.
Step 2: Assemble the base
To assemble the base, start by making two rectangular frames, each measuring 8 feet long by 4 feet wide. Use the 2x6s to create the outside frame, and the 2x4s to create the inside frame. Secure the corners of each frame using metal brackets and wood screws.
Step 3: Install the casters
Attach a caster to the bottom of each corner of the frame. This will allow the rotisserie to be easily moved around.
Step 4: Install the cross members
Install the cross members that will connect the two frames. Use 2x4s and secure them to the frames using metal brackets and wood screws.
Step 5: Install the vertical supports
Install the vertical supports that will hold the car. Use 2x4s and secure them to the cross members using metal brackets and wood screws. Make sure the supports are level and square.
Step 6: Add the rotisserie arms
To create the rotisserie arms, use 1/2 inch plywood and steel pipe. Cut the 1/2 inch plywood into 3 feet squares, and then cut each square diagonally to create two triangles. Attach the triangles to the steel pipes using wood screws and wood glue. Insert the steel pipes into the vertical supports, and secure them using nuts and washers.
Step 7: Add the Rotation Mechanism
Add the rotation mechanism using 1/2 inch threaded rods and plywood discs. Cut the 1/2 inch plywood into 2 feet squares. Drill a hole in the center of each disc, and attach them to the threaded rods using nuts and washers. Insert the threaded rods through the steel pipes, and secure them using nuts and washers.
Step 8: Test the Rotisserie
After building an auto rotisserie out of wood, it's important to ensure that it's safe and functional before using it to work on your vehicle. Here's how you can test your car rotisserie to ensure it's sturdy and secure.

Inspect the Rotisserie
The first step in testing your car rotisserie is to visually inspect it. Look for any cracks, splits, or other signs of damage in the wood or metal parts. Check that all bolts, nuts, and screws are tightened securely and that the casters are in good condition.
Load the Rotisserie
Load the car onto the rotisserie carefully, making sure that the weight is evenly distributed. Use a level to ensure that the car is straight and that the rotisserie is stable. Make any necessary adjustments to the rotisserie before proceeding.
Rotate the Rotisserie
Slowly rotate the car on the rotisserie, checking for any signs of wobbling or instability. The car should rotate smoothly and without any significant movement. If there is any wobbling, stop the rotation immediately and inspect the rotisserie for any loose connections or other issues.
Check for Clearance
Check that there is adequate clearance between the car and the rotisserie as you rotate it. Make sure that the car doesn't come into contact with any part of the rotisserie or that the rotisserie doesn't interfere with your ability to work on the car.
Test the Brake System
If your rotisserie has a brake system, test it to ensure that it's working properly. Apply the brakes and rotate the car to make sure that it doesn't move. Release the brakes and rotate the car again to ensure that it rotates smoothly.
Load and Unload the Car
Finally, load and unload the car onto the rotisserie a few times to ensure that the rotisserie is sturdy and secure. Make sure that the car is properly secured to the rotisserie and that there are no signs of instability or movement.

If at any point during the testing process, you notice any issues or problems with your car rotisserie, stop using it immediately and make any necessary repairs or adjustments before continuing. It's important to ensure that your car rotisserie is safe and functional before using it to work on your vehicle.
On the other hand, if you want to buy a sturdy, reliable, and heavy-duty rotisserie, please consider checking out our own Trade Hero Australia collection of car rotisseries.
In conclusion, building a car rotisserie out of wood is a challenging but rewarding project. With the right materials and tools, you can build a custom tool that is tailored to your needs. By following these steps, you can embrace your next car restoration project.